Getting Started
Koala can be used as a standalone cross-platform app that allows construction entry with
a table form. It is distributed as an MSI installer for Windows or DMG for macOS.
Alternatively, Koala for Rhino supports full 3D heat transfer analysis by modeling
volume blocks with assigned materials.
Mac Installation
Since app notarization requires a paid Apple Developer account, users will have to use
the following workaround.
The "Open Anyway" Workaround
This method allows you to manually authorize a specific app without lowering your
overall security settings.
- Attempt to open the app: Try
launching the app normally. When the warning dialog appears, click Done or
Cancel to dismiss it.
- Go to System Settings: Open the
Apple menu and select System Settings (or System Preferences on
older macOS versions).
- Navigate to Privacy & Security:
Click Privacy & Security in the sidebar and scroll down to the Security
section.
- Click Open Anyway: Look for a
message stating that the app was blocked. Click the Open Anyway button next
to it.
- Note: This button only remains
visible for about one hour after the failed attempt to open the app.
- Authenticate: Enter your Mac's login
password or use Touch ID when prompted.
- Confirm: A final warning will appear
asking if you are sure. Click Open to launch the app.
Interface Overview
The KOALA interface is designed to be intuitive and efficient. The main window is
divided into three primary areas:
- Navigation Bar: Access different
modules (Materials, Constructions, Solver).
- Workspace: The central area where
you edit materials or build geometric models.
- Properties Panel: Located on the
right, this panel shows details for the currently selected item.
Material Library
Before creating a construction, you need materials. KOALA comes with a standard library,
but you can create your own.
Navigate to the Materials tab. Click "New Material" to define
properties like Thermal Conductivity (λ), Density (ρ), and Specific Heat Capacity (cp).
Building Constructions
The Construction Editor is where you define the geometry of your
building assembly.
Adding Layers
You can add layers to your assembly. Each layer can be:
- Homogeneous: A single material slab.
- Inhomogeneous: A layer with repeating thermal bridges (e.g.,
studs). You can define the stud spacing and width parametrically.
Surface Resistances (Rsi/Rse)
Every construction requires Surface Film Resistances to account for the
thin layer of air clinging to the surface.
- Rsi (Interior): Represents the resistance at the indoor surface
(convection + radiation). Standard value for walls: 0.13 m²K/W.
- Rse (Exterior): Represents the resistance at the outdoor surface
(influenced by wind). Standard value for walls: 0.04 m²K/W.
KOALA automatically adds these layers to your construction stack. You do not need to
model them as material layers, but you can adjust their values in the Properties Panel
if simulating floors or roofs.
Running the Solver
KOALA performs two types of thermal simulations simultaneously: a
Steady-State
Analysis and a Dynamic Analysis (ISO 13786).
Boundary Conditions
The solver calculates heat flow based on the temperature difference (ΔT) between the
indoor and outdoor environments.
- Temperature: Set the Interior (e.g., 20°C) and Exterior (e.g.,
-10°C) air temperatures. The solver uses these to calculate the temperature
gradient through the assembly.
- Relative Humidity (RH): Define the moisture content of the air
on both sides. This is critical for Glaser Method condensation
risk analysis.
The solver discretizes your construction into a 2D mesh of rectangular finite
elements.
It solves the steady-state heat diffusion equation to determine the temperature at
every
node. This is crucial for identifying thermal bridges—areas where
heat
bypasses insulation (like through steel or wood studs), significantly reducing the
wall's effective performance.
Dynamic Analysis
In addition to the static U-value, KOALA computes dynamic thermal properties
according
to the ISO 13786 standard. This simulates how the wall reacts to fluctuating outdoor
temperatures over a 24-hour cycle, which is essential for understanding
thermal
mass and time lag.
Results
-
U-Value (Thermal Transmittance): Represents the rate of heat
transfer through the assembly. Lower values mean better insulation. KOALA
calculates
the U_Simulated, which accurately
accounts
for 2D thermal bridging effects that simple 1D calculations miss. U_Estimated uses a simple parallel path
U-Value calculation that is only valid if there is little to no lateral conducion
the the inhomogeneous layers.
- Decrement Factor: How much the
exterior temperature wave is dampened before reaching the interior. Lower is
better
for stable indoor temperatures.
- Time Shift (Phase Lag): The time
delay (in hours) for the peak outdoor temperature to reach the inside. A high
time
shift (e.g., 8-12 hours) can delay heat gain until night when it can be flushed
out.
EnergyPlus Integration (IDF Export)
KOALA bridges the gap between detailed component analysis and whole-building energy
simulation.
You can export your construction as an EnergyPlus Input File
(.idf).
This export generates an approximate "equivalent layer" representation of your
complex
2D assembly that can be used in energy models.
How to Use in Energy Modeling
- Export: in KOALA, go to `File >
Export > EnergyPlus IDF`.
- Import: Open your primary energy
model (in tools like OpenStudio, ClimateStudio, or DesignBuilder).
- Copy Objects: Copy the
`Material`
and `Construction` definitions from the exported IDF text file into your model's
IDF
file.
- Assign: Assign the new
construction
to surfaces (Walls, Roofs) in your building energy model.
Note: This export uses "equivalent homogeneous layers" to mimic the thermal mass and
resistance of the 2D assembly.
Rhino Plugin
While the standalone Koala application offers a quick and easy table form entry for
layered constructions, the Koala for Rhino plugin takes your analysis
capabilities into three dimensions.
Koala for Rhino supports full 3D heat transfer analysis by modeling volume blocks with
assigned materials. This allows you to evaluate complex geometric intersections,
corners, structural penetrations, and custom architectural details that cannot be easily
captured in a 1D or 2D table format.
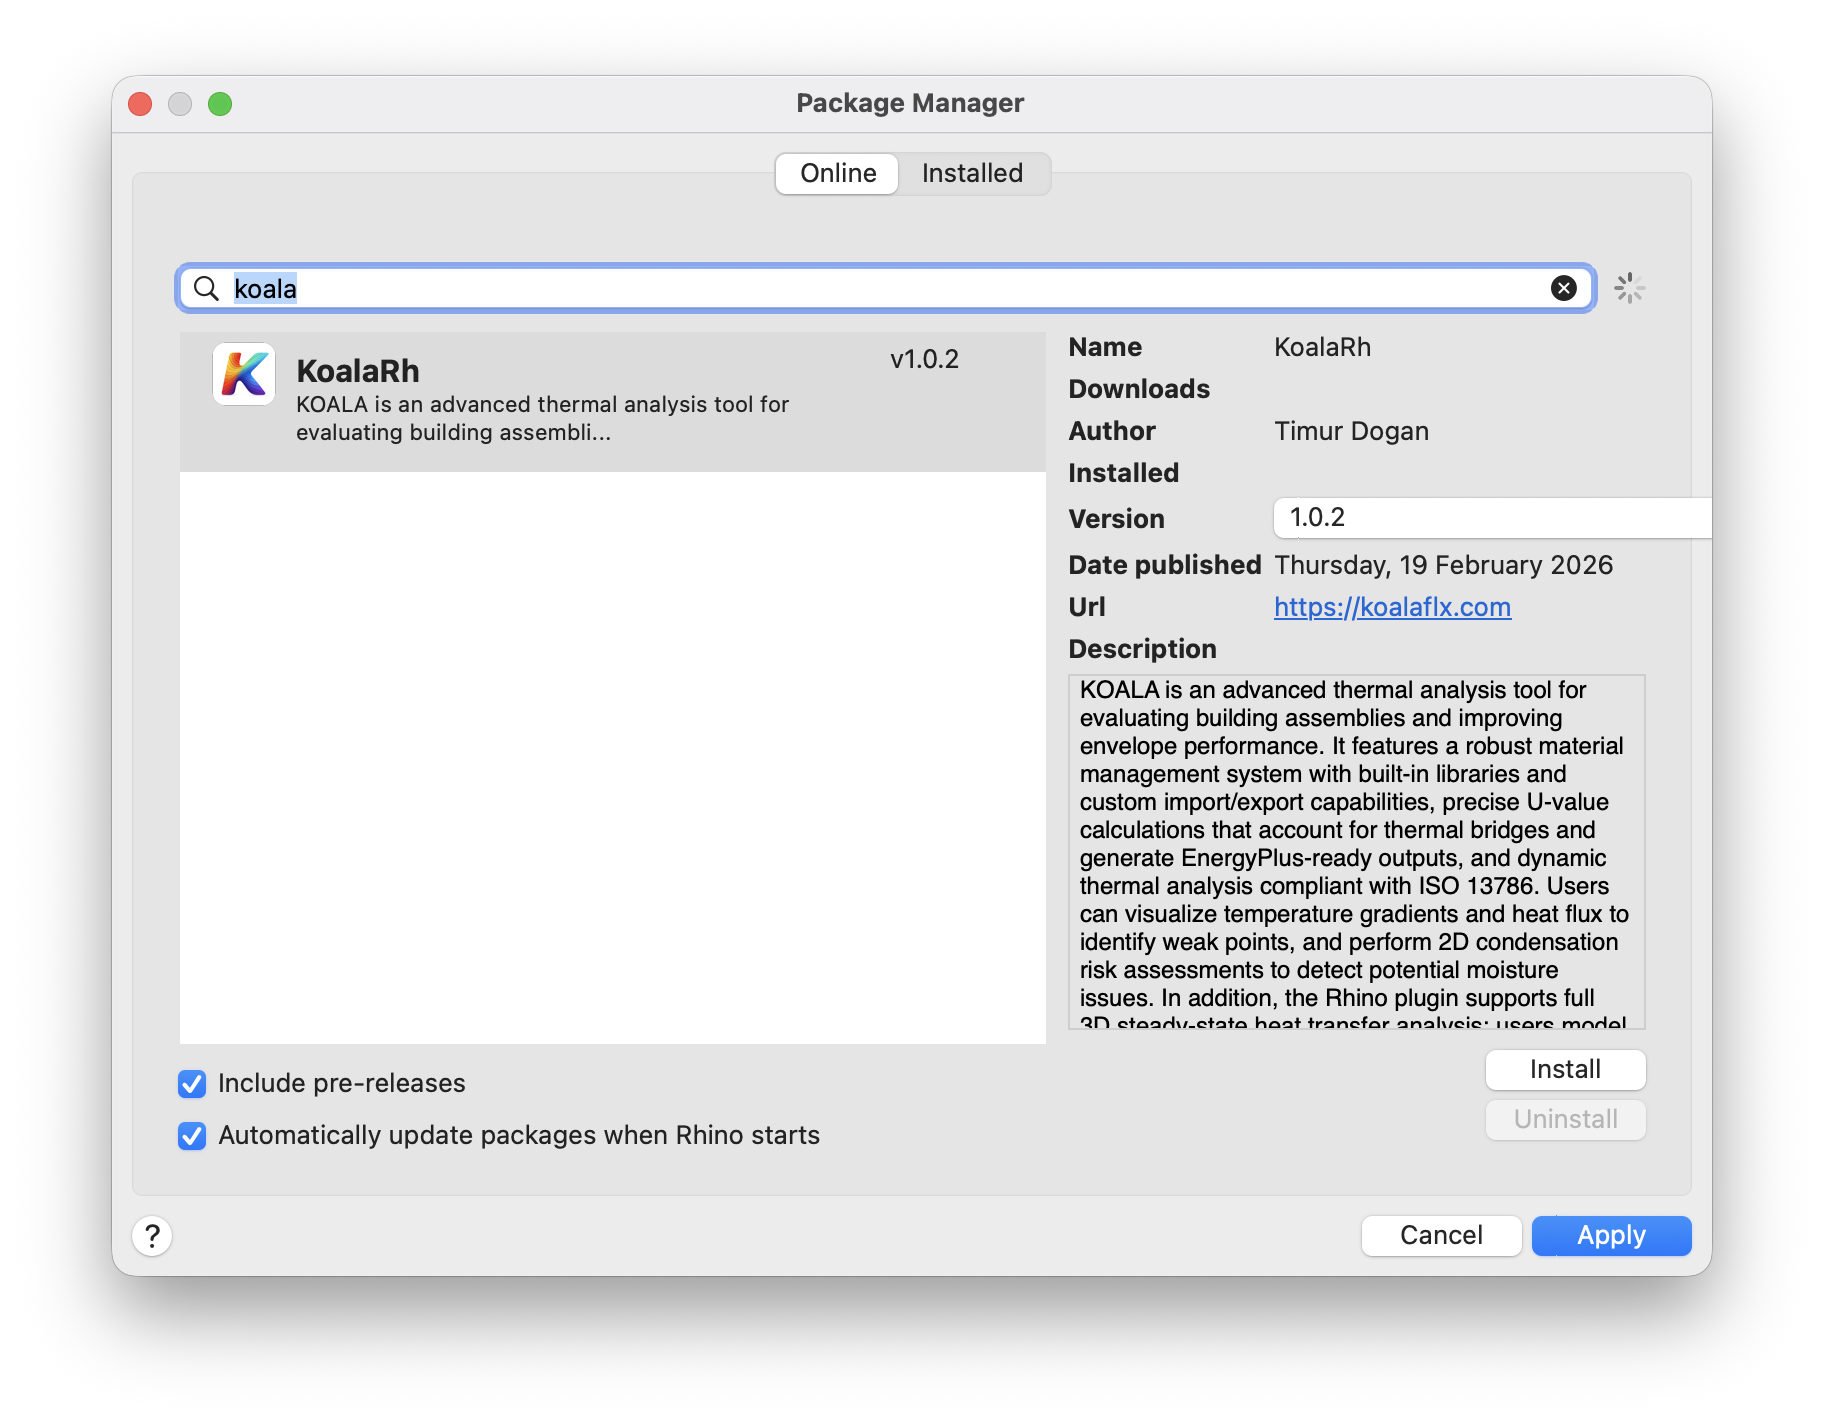
Installation via Package Manager
The easiest way to install Koala for Rhino is through the built-in
PackageManager command. Search for "Koala" and click install.
After installation, you must restart Rhino for the plugin to load
properly. Once restarted, simply type the KOALA command into the Rhino
command line to begin. A panel with a layer editor and simulation controls will appear.
Layer Editor and Voxelization
The layer editor is used to assign materials and boundary conditions to the geometric
volumes in your document. An important feature of the KOALA solver is how it handles
intersections through layer priorities during the voxelization process.
Layer order matters: Layers higher up in the list have priority over
lower layers. This is an extremely useful feature that allows modelers to draw volumes
that intersect each other without having to perform tedious boolean operations. For
example, if you have small metal fasteners that protrude through a layer of insulation,
you just need to ensure the fasteners are placed on a layer that is higher in
the list than the insulation layer. During voxelization, the fasteners will
automatically carve their volume out of the insulation.
Interface Overview
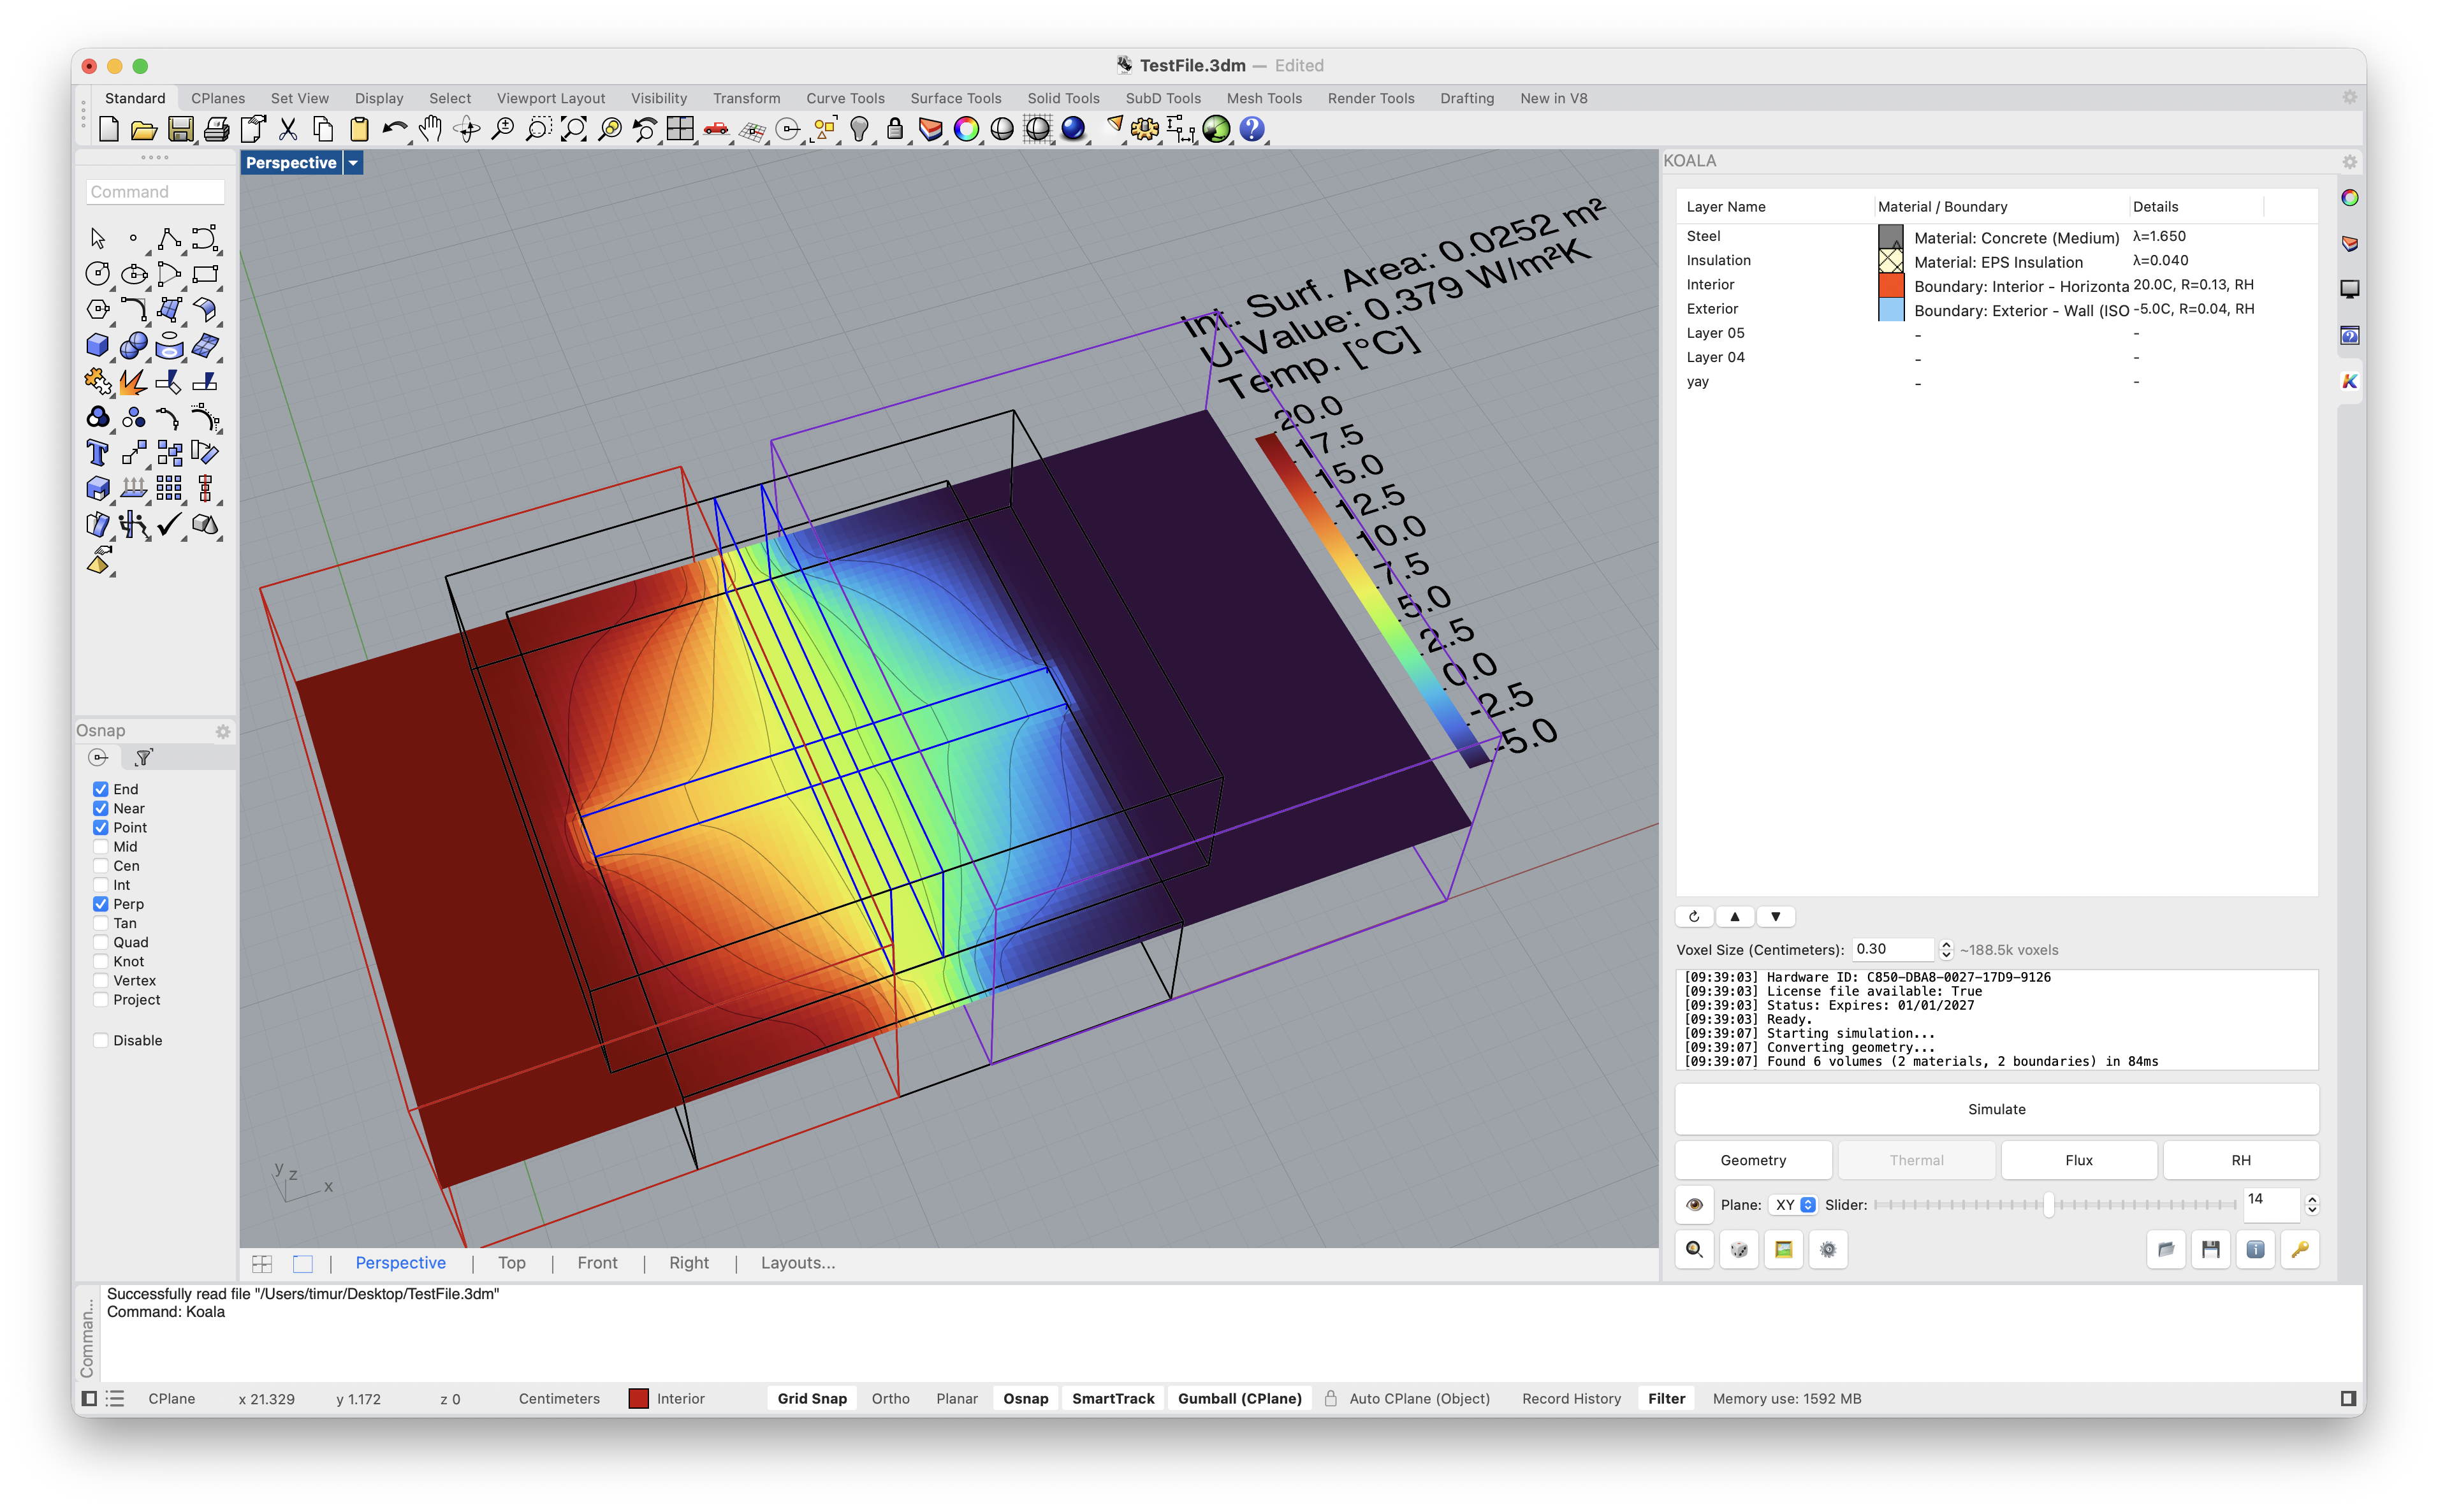
The Koala UI Panel consists of several key sections:
- Layer List: Displays and manages
your active Rhino layers along with their assigned materials. You can adjust the
layer priority for voxelization here.
- Settings & Refresh: The settings
icon opens configuration options for the voxel grid resolution. The refresh
button synchronizes the panel if you've made changes to the Rhino layer
structure.
- Simulation Controls: Set up your
boundary conditions including interior and exterior temperatures, as well as the
surface film resistances (Rsi and Rse).
- Compute: The prominent button at
the bottom initiates the voxelization and 3D heat transfer solver process.
- Visualization Modes: Once the
simulation completes, use these toggles to display geometry, thermal gradients,
heat flux vectors, or relative humidity right in the Rhino viewport.
- 3D Modeling: Build custom details
using Rhino's native volume blocks and solid modeling tools.
- Material Assignment: Assign thermal
properties directly to your 3D geometry using the layer editor.
- Advanced Analysis: Analyze full 3D
heat flows to accurately evaluate thermal bridges in joints and connections.